Call this Saturday to Get 10% OFF
Call this Saturday to Get 10% OFF
24-Hour Emergency Electricians in Fort WorthCall this Saturday to Get 10% OFF
Call this Saturday to Get 10% OFF
24-Hour Emergency Electricians in Fort Worth
Ceiling fans are great to install in areas like living rooms and patios. Whether it be the summer…
Ceiling fans are great to install in areas like living rooms and patios. Whether it be the summer or winter, they’re great support in the household. What if you want a ceiling fan installed in your home but you don’t have a fixture? The installation process might require a bit more work, but it’s not impossible to do. Hire an electrician from Mr. Electric to have your ceiling fan installation scheduled today.
In order to start installing the fan, you need to decide where you want it to go. This step is important because a ceiling fan that is installed improperly can be a serious safety hazard. An average ceiling fan weighs anywhere from around 15 to 50 pounds. Make sure to choose the appropriate support joints to hold the ceiling fan in place. Remember that the support on a roof fan separates it from your customary light installation. To help the vibration and weight of the fan, the ceiling fan boxes need to have braces to help support joists. Whenever you've thought about all of this and found the fitting area, mark it and cut an opening in the roof with a hand or saw.
The guys were super nice, I loved that they did the work immediately. Also after having a discussion with them about the static electricity from a lightenimg strike we had and it fried everything they suggested a surge protector to keep that from happening again. So we did that.
Scheduled an appointment with Mr Electric of Fort Worth and received a call they were able to show up early and had Dylan show up on time stocked with a full truck. He was able to diagnosis the issue quickly and restore my power to a few plugs that were causing the breakers to trip continuously. Dylan was very knowledgable, clearly explained the cause and how he would fix the issue, and addressed all concerns that we had. He was replaced two breakers and installed 2 new outlets along with diagnosing the problem in about an hour. Very quick and so far seems to have resolved our electrical issue. Would definitely recommend Mr Electric of Fort Worth!
Dylan was so nice and always on time. Very qualified and explained everything he needed to do in a way I understood. My older house required an outside panel so I had a lot of work but Dylan and his helper worked together very well and finished on time so I was not out of power more than needed. Everything looked and worked great when done. I don't know how he was able to replace the cracked power pole and wiring on my roof so quickly and beautifully. I am very, very impressed with his skill level and would request him for any future work. The company is very well organized and office contact was a pleasure to work with(which is rare since these positions are usually underpaid)so reward her well, she is the "door" to your organization. She and Dylan sealed my deal!
Cody was professional, knowledgeable, and was able to provide me with a quick diagnosis pertaining to a wiring issue in one of my rooms. He gave me the price for the repair/modification and fixed the issue all in less than an hour. Thanks Cody!
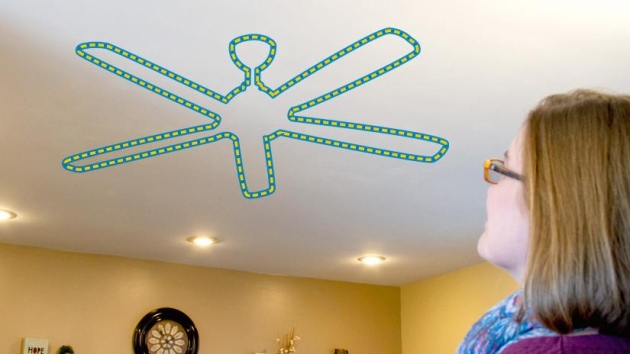
This is the most crucial step in the installation process. To avoid electrocution and other safety hazards, head to the circuit that powers your ceiling fan and switch it off. If you’re not sure which circuit belongs to the ceiling fan, cut off all the power.
Once the electric circuit is cut off, test the wires with a voltage tester before touching them. You can never be too safe, so make sure you’re following every safety precaution recommended. After you’ve secured your safety, look around for a wall switch that can control your fan and pay attention to where it’s located so you can drill the wall and place the wiring in the correct spot. Go up to your attic and drill a one-inch hole to place your wiring; drill a hole in the electrical box of the wiring too.
Use fish tape to locate the hole you made and pull wires that match the gauge of the already existing wiring. Join your new wires to the fish tape with electrical tape and start fishing the wires through the switch box and to your roof. Staple the wires each couple of feet and join them to the joists in your storage room.
We provide reliable, professional electrical services backed by licensed electricians and upfront pricing. Our team is committed to safety, quality workmanship, and on-time service for every job. With trusted local expertise and customer-first care, we deliver solutions you can count on.

Once you’ve gone over all the preceding steps, you can begin to install the electric box. If you have one support joist, the box can be nailed to the joist. If you have two, you will need the assistance of a brace and saddle. Cut a hole in the center of the support joists and push the brace with the electric box attached through the hole. Secure the brace according to instructions and slip a saddle over it. Insert the wiring to proceed to the next step.
Once you’ve installed the electric box and connected the wiring, it’s finally time to mount the ceiling fan. According to the manufacturer’s instructions, start assembling the fan onto its location. Turn the circuit power back on and test the fan to see if it’s working. During any time in the installation process, if you feel like you’ve done something wrong or don’t know how to continue, call an affordable electrician from Mr. Electric so we can do the ceiling fan installation. Don’t be afraid to seek professional help when needed.
With the fast growth of e-mobility, EV charging stations have become the main basic infrastructure to support the needs of owners…
Read More
A frequently tripping circuit breaker is not just inconvenient; it is a red flag you shouldn’t ignore. Even if you don’t…
Read More
When was the last time you had an expert examine the condition of your home's electrical system from behind its walls?…
Read MoreA functioning doorbell is one of the most basic yet essential features of a home. Over the years, technological advancements have…
Read MoreElectricity plays a crucial role in powering homes and businesses. With the growing demand for electrical needs due to technological advancements…
Read More